OpenVPN Server Overview
OpenVPN, short for Open Virtual Private Network, is an open-source VPN protocol that creates a secure, encrypted tunnel for data transmission between two networks or devices over the Internet.
What You’ll Achieve
When you finish this guide, you’ll have a modern, high-performance OpenVPN server with features that deliver:
Ultimate Remote Access: Securely access your home network from anywhere in the world.
Enhanced Privacy: All Internet traffic is routed through the VPN and out your home network gateway.
Modern Security: Protection with Elliptic Curve Cryptography (ECC) for certificates and
tls-cryptfor the entire VPN channel.Maximum Performance: Data Channel Offload (DCO) significantly boosts speed by decrypting and routing data directly in the kernel.
Simple Client Management: Automated Client configuration for easy setup on all your devices.
How It Works

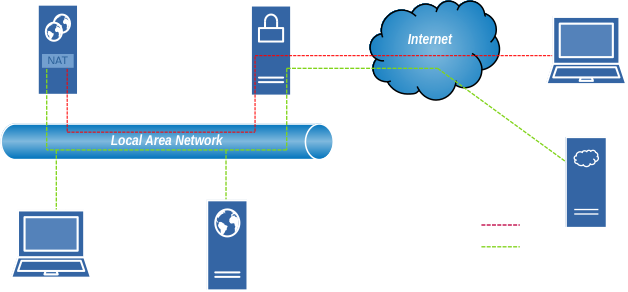
This diagram shows how OpenVPN creates a secure tunnel between a remote Client and the VPN Server. Traffic is routed from the VNP Server to the Local Area network (LAN) using IP Masquerading (NAT).
Network Components
OpenVPN Server: Located on your local network; manages VPN connections and handles network routing, using NAT.
OpenVPN Client: Remote devices (laptops, phones) connecting securely from the internet
Gateway Router: Your home router that connects to the internet
Traffic Security
The diagram shows three types of network traffic:
Encrypted VPN Tunnel (Red Dashed Line):
Secure: All data is encrypted between client and server across the internet
Allows remote access to local resources and routes Internet traffic through your home connection
Local Network Traffic (Green Dashed Line):
Unencrypted: Normal traffic within your local network
Also represents direct Internet traffic that doesn’t use the VPN
Physical Connections (White Solid Lines):
Hardware connections (ethernet cables, WiFi) between devices
Setup Process
This guide walks you through three main phases:
Server Installation & PKI Setup
Install OpenVPN and Easy-RSA
Create certificates and encryption keys
Generate the
tls-cryptauthentication key
Server Configuration
Configure the main
server.conffileSet up network routing and firewall rules
Enable the OpenVPN service
Client Management
Generate client certificates
Create easy-to-use
.ovpnconfiguration filesDistribute to your devices
Client Configuration Script
The included make-client-ovpn.sh script simplifies client setup by automatically creating secure, all-in-one configuration files.
What It Does
Creates
.ovpnfiles: Single files containing all necessary certificates and keysEmbeds security keys: Includes CA certificate, client certificate, private key, and
tls-cryptkeyUses your settings: Applies your custom client configuration from
client-base.conf
How to Use
Generate client certificate:
cd ~/easy-rsa
./easyrsa build-client-full client-name nopass
Create the configuration file:
./make-client-ovpn.sh client-nameFind your file:
~/easy-rsa/client-ovpn-files/client-name.ovpn
Attention
For the above commands to work you need to complete the EasyRSA setup, which can be found on the following page.
Common Issue
Connection Works But Websites Won’t Load
If you can connect to the VPN and ping devices but websites and SSH don’t connect, this is often an MTU (Maximum Transmission Unit) issue.
Quick Fix:
Add this line to your server.conf and restart the OpenVPN service:
tun-mtu 1432
When This Happens:
Your internet connection uses PPPoE (common with Home Internet both DSL and Fiber)
VPN packets are too large and get fragmented or dropped
For a detailed explanation of MTU calculation and troubleshooting:
What’s Next
Server installation and certificate setup
Configuration file creation
Firewall and routing setup
Client configuration and testing